New Features And Enhancements In v3.2.2
In this article:
- New speech sounds audiogram background available for audiological reports
- Multiple automated print campaigns can now be marked as sent in one click
- Quote and Credit Memo templates now available as customizable Word documents
- New field for storing insurer email address
- Easy selection from a list of miscellaneous recipients when emailing documents
- User signatures can now be set in the Setup menu
- Ability to move payment from one patient file to another
- Available upon request: patient ID now viewable alongside patient name in more patient lists
- More file types supported in the patient Documents tab for uploading, downloading, and emailing
- Updates to WorkSafeBC 51D12 and 83D72 forms (Canada only)
- New privilege to control editing patient referral source history
- Timed inactivity logoff now configurable in the Setup menu
—
New speech sounds audiogram background image
In an effort to provide you with additional patient reporting options, we’ve made available a new speech sounds audiogram background image. The following merge fields will pull this background image into your patient report:
- speechSoundsAudiogram
- speechSoundsAudiogramLeft
- speechSoundsAudiogramRight
- speechSoundsAudiogramBinaural
These merge fields feature in two new pediatric audiological reports, available at our template tool. You can also download them by clicking here: Patient Speech Sounds Audiogram (Pediatric)_Style 1 or Patient Speech Sounds Audiogram (Pediatric)_Style 2
If you would like to deactivate templates navigate to Setup > Templates > Forms > right click on the template you would like to remove > Deactivate.
—
Multiple automated print campaigns can now be marked as sent in one click
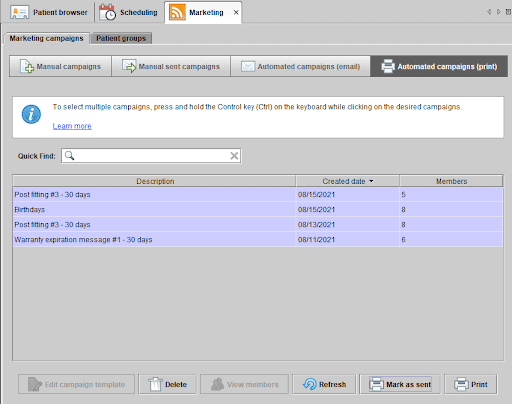
In the Automated campaigns (print) tab of the marketing module, you can now select multiple campaigns and mark them as sent, as one batch.
To select multiple campaigns, press and hold the Control key (Ctrl) on the keyboard while clicking on the desired campaigns.
—
Quote and Credit Memo templates now available as customizable Word Documents
With this release, users with the Manage templates user privilege will be able to customize clinic templates for quotes and credit memos, just as with invoices. In addition, “estimates” are now called “quotes” in the user interface, to accord with the unlikeliness in audiology clinics of the final price being different from the quoted price.
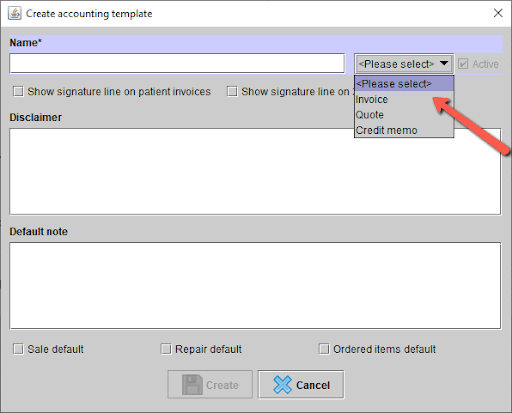
To do this, go to Setup > Templates > Accounting templates. Once there, use the Create new button to choose the document you want to use as a template; alternatively, drag and drop the document into the Blueprint OMS window. Then, the Create accounting template dialog will appear; in it, name the template, set the template category (Invoice, Quote, or Credit memo), and optionally set a description.
—
New field for storing insurer email address
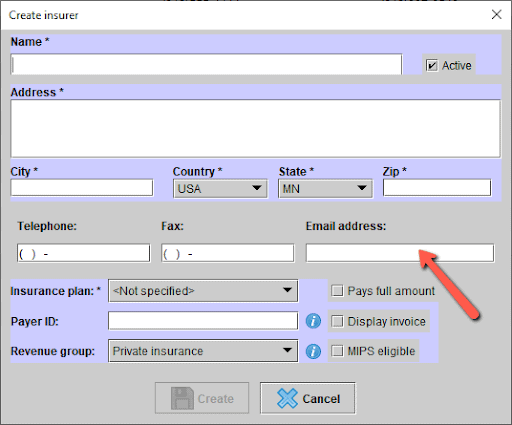
At Setup > Insurers, the Create insurer and Insurer details dialogs now have a field for an email address, so that you can email patient documents to insurers. The Maintain insurers user privilege will be needed to set email addresses here for insurers.
—
Easy selection from a list of miscellaneous recipients when emailing documents
With this feature, your clinic will be able to keep a list of miscellaneous email addresses, to choose as recipients when emailing documents out.
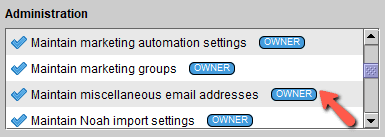
Users with the Maintain miscellaneous email addresses user privilege will be able to maintain the list of miscellaneous email addresses at Setup > Miscellaneous emails. Examples of email addresses you may want to store include those for neighboring hospitals or secondary addresses for manufacturers and physicians.
To email a document to one of these miscellaneous email addresses, go to the document and select Email other… The Select email recipient dialog will appear; in it, you can search for your intended recipient and proceed.
—
User signatures can now be set in the Setup menu
Prior to this upgrade, our technicians have been uploading and modifying user signatures. This functionality is now available in the Setup menu, to users with the Maintain users and roles user privilege.
To upload a user’s signature, go to Setup > User administration > Users > Edit details and click on the signature field to upload a scan of the signature.
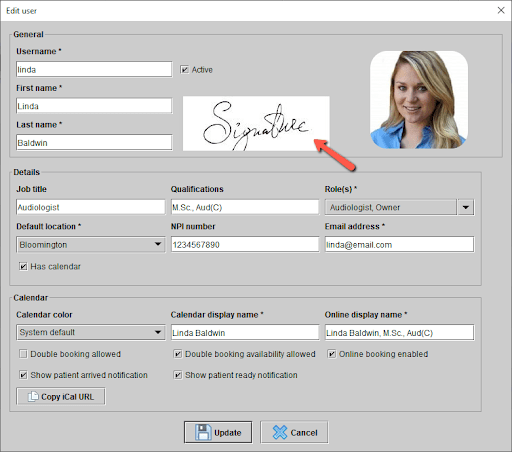
For ideal results, user signatures should fit within a 3:1 rectangle. Our user signature template can help collect user signatures in a shape that will work with Blueprint OMS. You can download it here.
User signatures can populate in suitably configured forms, correspondence, and accounting templates.
—
Ability to move payment from one patient file to another
To correct the common user error of logging a payment on the wrong patient file, users with the Edit payment privilege can now edit the patient associated with a payment.
For US clinics: this new ability is especially helpful in the case of payments integrated with payment processing, which cannot be deleted and re-entered. To learn more about integrated payment processing, see our user guide page: here.
To move a payment from one patient file to another, find the payment in the Sales history tab of the incorrect patient. Right-click on the payment, and select Edit payment details. Then, the Edit payment dialog will appear. In it, click on the hamburger button beside the patient’s name. A menu will appear in which you can set the correct patient.

The move of the payment will be reflected in the correct patient’s journal.


—
Available upon request: patient ID now viewable alongside patient name in more patient lists
Some systems are on a configuration option that displays patients’ ID numbers alongside their names in various panels, such as the patient browser. We’ve enabled more panels to show patient ID numbers, for systems using this configuration option.
The patient ID can now be viewed in the following panels:
- Orders
- Bank deposits, Saved deposits
- Enter 3rd party payment
- 3rd party ledger
- 3rd party receivables (Canada only)
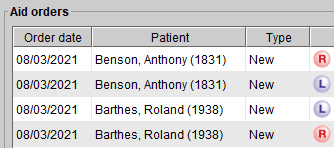
To activate this configuration option, contact our support team by sending us a support ticket.
—
More file types supported in the patient documents tab for uploading, downloading, and emailing
Previously, Blueprint OMS was only compatible with JPG, PNG, GIF, DOCX, DOC, PDF, ODT, RTF, HTML, and BMP files. Blueprint OMS now offers the ability to upload files of any type, so long as the document does not exceed the size limit of 50 MB. In addition, all file types can now be emailed out via the patient’s Document tab. Previewing and faxing will be available for file types that can be rendered as PDFs, including now TXT, XML, and CSV files.
—
Canada Only
Updates to WorkSafeBC 51D12 and 83D72 forms
The 51D12 form now supports the service code 1246208.
The old 83D72 form has been replaced with its new version.
—
New privilege to control editing patient referral source history
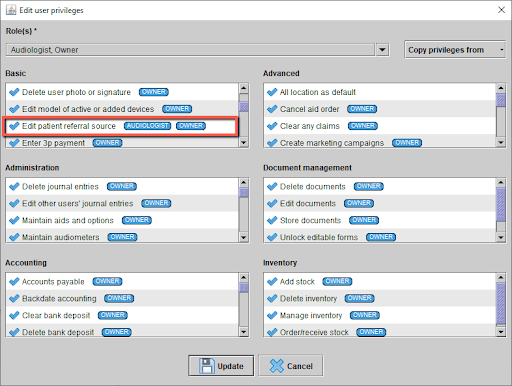
The ability to edit patient referral source histories is now attached to its own user privilege, Edit patient referral source. All users will have this privilege by default, so that old functionality will not be disrupted by the release; but system administrators can now take this privilege away from users.
To adjust any user’s privileges, go to Setup > User administration > Users, select a user, right-click, select Edit privilege, and make any desired changes in the Edit user privileges dialog. You’ll need the Maintain users and roles user privilege to do this.
A user lacking the Edit patient referral source privilege will be able to set referral sources for new patients and appointments, but will not be able to:
- Edit referral source history with a patient’s Marketing tab,
- Edit the referral source of an existing appointment, or
- Edit the referral source of a new or existing sale.
—
Timed inactivity logoff now configurable in the Setup menu
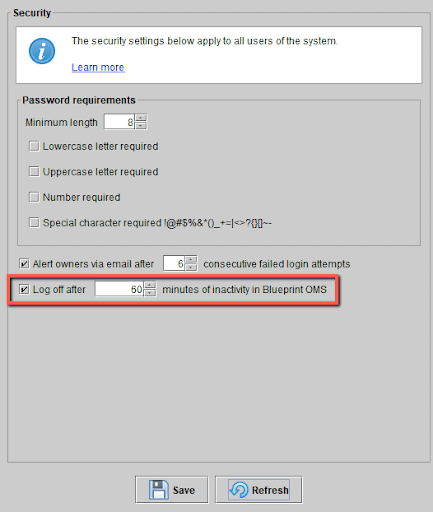
Previously, Blueprint OMS would automatically log you out of your session after 60 minutes of inactivity in the application. With this new update, owners can go to Setup > Security and adjust the time interval, or turn off the inactivity timeout setting altogether. When making adjustments in this screen, be sure to hit Save so the changes can take effect.
—
Have questions about these features? Our support team is always ready to assist! Get started by visiting our Help Center.
Related Articles
New Features and Enhancements in v4.6.2
In this article: New Features and Enhancements: Financing Pre-Screening is Now Available through CareCredit QuickScreen Integration (US only)...
Read MoreESCO Continuation of Care Form
Blueprint Solutions / ESCO integration Bringing loyal patients back to the office is a critical part of any...
Read MoreNew Features and Enhancements in v4.6
In this article: Integration with QuickBooks Online Apply a Return Charge as a Percentage of the Line Item...
Read More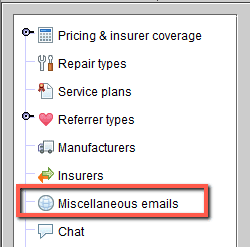
No comments